這次的筆記內容將使用倒Node MCU來製作一個Webserver,能讓手機透過瀏覽器來控制LED燈。為了接下來能使用手機簡單的控制家中紅外線遙控冷氣、智慧插座等功能來做準備
我這邊使用到的是HTTP通訊,HTTP通訊的優點是不需要特別寫應用程式,直接用瀏覽器即可直接觀看內容,其他還有TCP、MQTT等的通訊方式,需要另外寫客戶端應用程式。
最後一件額外的事情,因為是要自己用的,所以會在網頁呈現上下了點功夫,像是用到bootstrap,程式碼有做排版優化給自己後續好擴充用等,這些在內文不會詳細描述,但會提供參考資料。
第一步:ESP8266連上網路並顯示網頁
首先我們要先來讓網路連上線,參考網站是這兩篇
這也是本篇最困難的部分,同時會直接設定好wifi連線,程式細節上面兩個網站寫得很完整,有興趣可以進去看。
為什麼要用這個方法呢,如果有去查其他人使用的方法的話應該會發現大部分的作法都是直接將html寫入arduino code內,但是對於我來說這方法太眼花撩亂了,我還是喜歡直接用一個完整的html檔案,也方便後續擴充修改。
第二步:編輯HTML
一開始先不用太複雜
能長類似這樣就好,程式碼一樣附在最後,
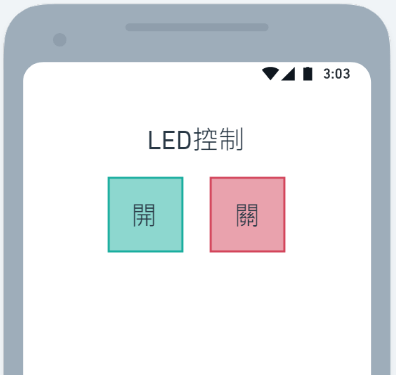
並且要設置案下開、關時自動轉址。
arduino端也要寫下對應的轉址,這樣就可以觸發事件,寫入以下程式。
  server.on("/", Homepage);
  server.on("/on", red_OPEN);
  server.on("/off", red_CLOSE);


void red_OPEN(){
  digitalWrite(LED, HIGH);
  Homepage();
}

void red_CLOSE(){
  LEDcontrol('w',LOW);
//下面的檔案會改成這句,為了之後新增其他LED等其他腳位可以直接使用同一個function
  Homepage();
}


void Homepage(){

  File file = SPIFFS.open("/test.html", "r");
  server.streamFile(file, "text/html");
  file.close();
}
在red_OPEN的function底下寫入LED控制的程式即可開關燈囉。
完整程式碼共分三個檔案,如下
1.wifi_control.ino
#include "Web.h"

void LEDcontrol(char i, bool B);

const char* ssid = "你家中的路由器SSID";
const char* password = "你家中的路由器密碼";

uint8_t LED = D0;  //設定板載按鈕方便測試不用接線路
bool pin = LOW;//其實也可以不用這句,端看個人用途

//設定80port,我記得預設也是80port可以自己改成其他的
ESP8266WebServer server(80);

void setup() {
  //---------------設定腳位
  pinMode(LED,OUTPUT);
  digitalWrite(LED,pin);

  //---------------開啟監看視窗
  Serial.begin(115200);
  // --------------啟用SPIFFS檔案系統
  SPIFFS.begin();


  //---------------給連接網路一點時間
  Serial.print("\nWifi Connecting");

  while (WiFi.status() != WL_CONNECTED)
  {
    delay(500);
    Serial.print(".");
  }

  delay(100);
  Serial.print("Connected, IP address: ");
  Serial.println(WiFi.localIP());

  setserver_on();  //自己寫的function  內容請移到Web.ino看

  server.onNotFound([](){
    if (!handleFileRead(server.uri())) {
      server.send(404, "text/plain", "FileNotFound");
    }
  });

  //------------------啟動伺服器
  server.begin();
  Serial.println("HTTP server started");

}

void loop() {

  server.handleClient();
  delay(100);

}
2.Web.h
#include <ESP8266WebServer.h>
#include <FS.h>
#include <WiFiClient.h>
3.Web.ino
#include "Web.h"

//這邊是為了能一次性讀取各種檔案用的,如果有要用到副檔名不在裡面的,要自己加進去
String getContentType(String filename){
  if(server.hasArg("download")) return "application/octet-stream";
  else if(filename.endsWith(".htm")) return "text/html";
  else if(filename.endsWith(".html")) return "text/html";
  else if(filename.endsWith(".css")) return "text/css";
  else if(filename.endsWith(".js")) return "application/javascript";
  else if(filename.endsWith(".png")) return "image/png";
  else if(filename.endsWith(".gif")) return "image/gif";
  else if(filename.endsWith(".jpg")) return "image/jpeg";
  else if(filename.endsWith(".ico")) return "image/x-icon";
  else if(filename.endsWith(".xml")) return "text/xml";
  else if(filename.endsWith(".pdf")) return "application/x-pdf";
  else if(filename.endsWith(".zip")) return "application/x-zip";
  else if(filename.endsWith(".gz")) return "application/x-gzip";
  return "text/plain";
}


bool handleFileRead(String path){
  Serial.println("handleFileRead: " + path); // 在序列埠顯示路徑

  if (path.endsWith("/")) {
    path += "index.html";
  }

  String contentType = getContentType(path);

  if (SPIFFS.exists(path)){
    File file = SPIFFS.open(path, "r");
    server.streamFile(file, contentType);
    file.close();

    return true;
  }
  return false;
}


//設定轉址功能
void setserver_on()
{
  server.on("/", Homepage);
  server.on("/on", red_OPEN);
  server.on("/off", red_CLOSE);
}

//當街上更多LED可一樣用這個function
void LEDcontrol(char i, bool B)
{
  switch(i)
  {
    case 'w':
      digitalWrite(LED, B);
      pin = B;
      break;
    case 'r':
      break;
  }
}


//--------------------收到網頁請求要做的事情

void red_OPEN(){
  LEDcontrol('w',HIGH);
  Homepage();
}

void red_CLOSE(){
  LEDcontrol('w',LOW);
  Homepage();
}

void Homepage(){

  File file = SPIFFS.open("/test.html", "r");
  server.streamFile(file, "text/html");
  file.close();
}
4.要用到SPIFFS上傳的test.html
<!DOCTYPE html>

<html>
<head>
  <meta charset="UTF-8">
  <title>ESP8266 Web Server</title>
  <meta name="viewport" content="width=device-width, initial-scale=1">
<!-- 下面這段使用bootstrap只是為了按鈕效果,不需要的就自己刪掉吧 -->
  <link href="https://cdn.jsdelivr.net/npm/bootstrap@5.0.1/dist/css/bootstrap.min.css" rel="stylesheet">

  <style>
    html {
      font-family: Arial;
      display: inline-block;
      margin: 0px auto;
      text-align: center;
    }
    h1 {
      color: #0F3376;
      padding: 2vh;
    }
    p {
      font-size: 1.5rem;
    }
    }
  </style>

</head>
<body>
  <h1>HOME Web Server</h1>

  <p>
    <a href="/on"><button type="button" class="btn btn-outline-success btn-lg">ON</button></a>
    <a href="/off"><button type="button" class="btn btn-outline-danger btn-lg">OFF</button></a>
  </p>

</body>

</html>
最後再次說明用這麼複雜的原因,接下來還會加上紅外線遙控功能,我就能直接以手機瀏覽器控制家中的紅外線設備了!
